Are you dreaming of launching your own website but feeling overwhelmed about where to start? I’ve been there too. After trying multiple hosting providers, I discovered that Hostinger offers one of the simplest ways to get your website up and running quickly. Let me walk you through the entire process of buying hosting from Hostinger in easy-to-follow steps that anyone can understand.
What Makes Hostinger the Best Choice for Web Hosting?
When I first started my online journey, I was confused by all the technical jargon. You probably feel the same way. Hostinger stands out because it provides:
- Fast loading speeds with cutting-edge LiteSpeed web servers
- Top-notch security features including malware scanners and DDoS protection
- 99.9% uptime guarantee so your website stays online
- 24/7 customer support through live chat in multiple languages
- Money-saving benefits like free domain and website migration
- 30-day money-back guarantee for risk-free purchase
These features make Hostinger perfect for beginners and experienced website owners alike. Whether you’re starting a small blog or building a business website, Hostinger has a plan that fits your needs.
How Do I Choose the Right Hostinger Plan for My Needs?
Before rushing to buy hosting, take a moment to think about what you really need. Ask yourself:
- How big will my website be?
- How much traffic do I expect?
- What is my budget?
- Do I need special features?
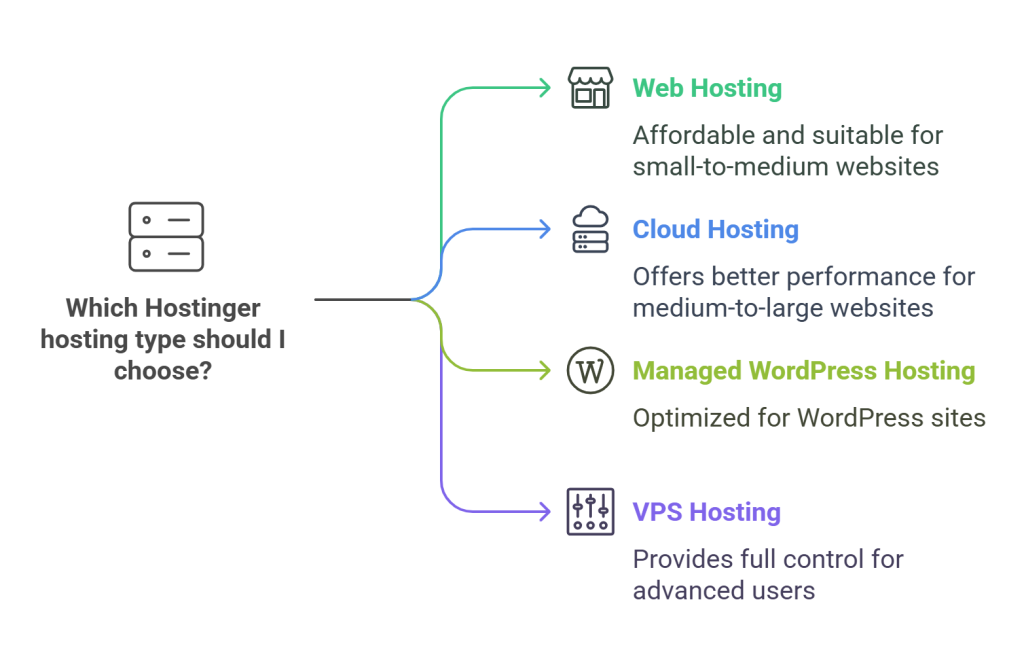
Hostinger offers several hosting types to match different requirements:
Web Hosting: Perfect for small-to-medium blogs, business websites, and online stores. You share server resources with other websites, making this the most affordable option.
Cloud Hosting: Uses multiple servers for better performance and stability. Ideal for medium-to-large business websites and online stores that need more power.
Managed WordPress Hosting: Specially optimized for WordPress with features like LiteSpeed acceleration and automatic updates. Great if you’re building a WordPress site.
VPS Hosting: Gives you your own virtual server with full control. Best for advanced users who want complete freedom over their hosting environment.
For most beginners, the shared Web Hosting plan is the perfect starting point. It’s affordable and includes everything you need to get started.

How to Buy Hosting from Hostinger in 4 Simple Steps?
Step 1: How Do I Select the Right Hosting Plan?
Visit Hostinger’s website and look at the available hosting plans. Compare the features and prices to find one that matches your needs. Once you’ve decided, click the “Choose Plan” button.
Remember to consider your long-term goals. If you expect your website to grow quickly, you might want to start with a slightly more powerful plan to avoid upgrading too soon.
Step 2: What Hosting Period Should I Choose?
After selecting your plan, you’ll be taken to your cart where you can choose how long you want to pay for hosting:
- 1 month
- 12 months
- 24 months
- 48 months
The longer periods offer bigger discounts, saving you money in the long run. Most people choose at least 12 months to get the best value. Don’t worry – if you need to upgrade later, Hostinger will add your remaining subscription time to the new plan.
Step 3: How Do I Create a Hostinger Account?
Next, you’ll need to create a Hostinger account. This is very simple:
- Enter your email address
- Create a password
- Verify your email
If you already have a Hostinger account, just click “Log in” instead and use your existing details.
Step 4: What Payment Methods Can I Use?
The final step is making the payment:
- Enter your billing address
- Check the order summary to make sure everything is correct
- Choose your payment method (credit/debit card, PayPal, or eWallets like Google Pay)
- Complete the payment
The available payment options may vary depending on your country, but Hostinger accepts most major payment methods worldwide.
What Should I Do After Buying Hosting from Hostinger?
After completing your purchase, Hostinger will guide you through the next steps. You’ll have two main options:
How Do I Create a New Website?
If you’re starting from scratch, Hostinger will ask if you want to use:
- WordPress: The world’s most popular website platform, offering endless customization options
- Hostinger Website Builder: A simpler drag-and-drop tool that lets you build a website quickly without technical knowledge
Both options are excellent, but WordPress gives you more control while the Website Builder is easier for beginners. Follow the onboarding steps to set up your chosen platform.
How Do I Move My Existing Website to Hostinger?
If you already have a website with another provider, Hostinger offers free migration services. Simply:
- Select “Migrate a website” during onboarding
- Enter your current website URL
- Follow the instructions provided
The migration can take up to 48 hours to complete. Once finished, Hostinger will notify you by email that your website has been successfully moved.
Why Should I Choose Hostinger Over Other Hosting Providers?
When comparing hosting companies, Hostinger consistently stands out for several reasons:
- Affordable pricing: Plans start at incredibly low prices, making it accessible for everyone
- User-friendly interface: Their custom control panel (hPanel) is designed to be easy for beginners
- Free domain name: Many plans include a free domain for the first year
- Free SSL certificate: Keep your website secure at no extra cost
- Website builder included: Create a professional website without coding skills
- Global data centers: Choose a server location close to your target audience for faster loading
These benefits make Hostinger an excellent choice for anyone starting their online journey, especially if you’re on a tight budget or new to website creation.
What Do I Need to Know About Domains When Buying Hosting?
When purchasing hosting, you’ll also need a domain name – the address people type to visit your website (like example.com). Hostinger makes this process simple:
- During checkout, you can search for available domain names
- Many Hostinger plans include a free domain for the first year
- You can choose from extensions like .com, .in, .co, and many others
- After the first year, you’ll need to renew your domain (usually around $10-15 per year)
If you already own a domain from another provider, you can easily connect it to your Hostinger hosting without transferring it.
How Can I Save Money When Buying Hostinger Hosting?
Everyone loves a good deal! Here are some tips to get the best value when purchasing Hostinger:
- Look for special promotions and discount codes (they frequently offer sales)
- Choose a longer subscription period for bigger discounts
- Start with a basic plan and upgrade only when needed
- Take advantage of the free domain included with many plans
- Use the 30-day money-back guarantee to test the service risk-free
Remember that the advertised prices are usually for the first term only. Renewal rates are typically higher, so factor this into your budget planning.
What Technical Specifications Should I Consider?
While Hostinger makes hosting simple, understanding a few technical details will help you make a better choice:
- Server location: Choose a data center close to your target audience for faster loading times
- Bandwidth: Consider how much traffic your site will receive (most Hostinger plans offer unmetered bandwidth)
- Storage space: Make sure you have enough space for all your website files
- Number of websites: Check how many separate websites you can host on your plan
- Database limits: Important if you’re running complex websites or applications
Hostinger’s plans are designed to provide adequate resources for most websites, but understanding these specifications ensures you won’t outgrow your plan too quickly.
Conclusion
Buying hosting from Hostinger is a straightforward process that takes just a few minutes. By following the four simple steps outlined in this guide, you can have your hosting account set up and ready to use in no time:
- Choose your hosting plan based on your needs
- Select your preferred hosting period (longer periods save more money)
- Create a Hostinger account or log in to your existing one
- Complete the payment using your preferred method
After purchase, you can either create a new website using WordPress or Hostinger’s Website Builder, or migrate your existing website from another provider.
With Hostinger’s combination of affordable pricing, user-friendly tools, and reliable performance, you’re making an excellent choice for your website hosting needs. Their 30-day money-back guarantee also means you can try their services risk-free.
Ready to start your online journey? Head over to Hostinger today and take the first step toward building your dream website!

